Installation
Standard Column Install
-
The following instructions are for our NEW ABS plastic Caps and Bases
1. Trim the pipe shaft slightly shorter than the height of the vertical span.
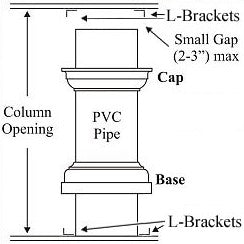
2. Place the cap and base on the shaft as illustrated and tape securely.
3. Stand the column in place and level it.
4. Secure the column with L-brackets and screws at the top and bottom
(L-brackets not included).
5. Slide cap up the PVC pipe to the ceiling and draw pencil lines along the two opposite out side edges of the cap. Drop the cap back down the shaft. Take L-brackets or wood blocking then fasten to the ceiling 5/8'' for 10" PVC and 1/2" for 8" PVC inside the lines drawn. Make sure the perpendicular side of each bracket is facing away from the column shaft.
Slide the cap up and dry fit it to be sure it grips the L-brackets. Next apply construction adhesive to the outside face of each L-bracket or wood block then slide the cap into place. Temporarily tape the cap firmly to the ceiling for about 1 hour using painters masking tape.
Note: You may want to apply a small amount of construction adhesive on the edges of the cap and base for additional bonding.
6. Repeat the last procedure for the base, except fasten the L-brackets 1/8'' inside the lines drawn.
7. Use an alcohol based cleanser to thoroughly clean all dust, dirt, oil and grease off of the column (pipe), cap and base.
8. Prime with BEHR PREMIUM PLUS® 434 Interior/Exterior Oil-Based Primer or KILZ® Original Primer. Follow dry time directions for the primers, then topcoat with any BEHR PREMIUM PLUS® or BEHR EXPRESSIONS® topcoats or equivalent. -